Hi Ant
I brought an apple wand to one of the early meetings, James D commented that oil was better than varnish and that there should be as few joints from one part to another. each junction means that vibrations will be reflected back.
Cheers
Richard
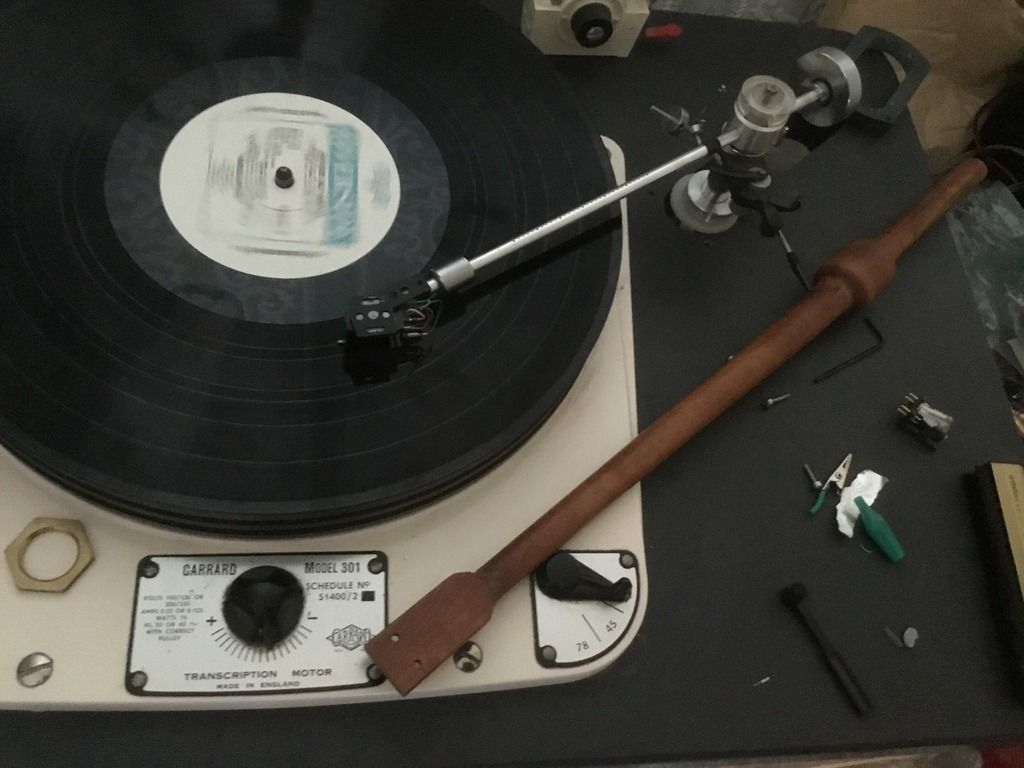
A unipivot made from scrap
-
Richard Higgins
- User
- Posts: 159
- Joined: Thu Oct 18, 2007 12:54 pm
- Location: Oxford
-
Paul Barker

- Social Sevices have been notified
- Posts: 8988
- Joined: Mon May 21, 2007 9:42 pm
#32 Re: A unipivot made from scrap
Was it you who made this for me Richard? My memory is very foggy.
"Two things are infinite, the universe and human stupidity, and I am not yet completely sure about the universe." – Albert Einstein
-
cressy

- Shed dweller
- Posts: 2906
- Joined: Fri Aug 03, 2007 7:07 pm
- Location: the great white space
- Contact:
#33 Re: A unipivot made from scrap
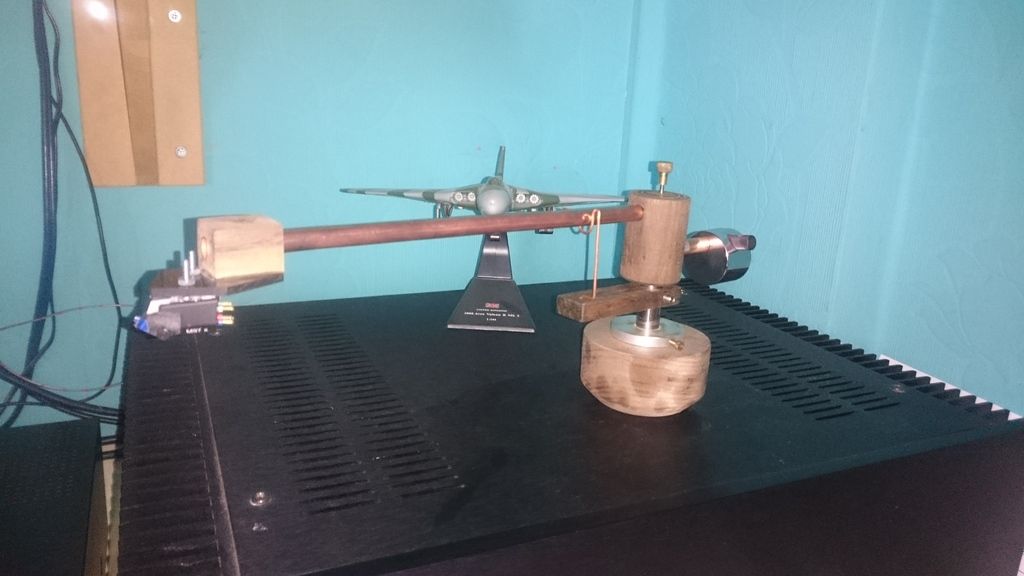
After letting the Danish oil soak in ive reassembled it and trimmed the arm tube to the right length so its the same as the rega.
It will adjust forward bt about 10mm if needs be and backwards as far as needed.
The stub will need trimming to length and filling with something to replace the lost weight. Will ponder on that.
The missus says she qiite likes how it looks, reckons it looks quite steampunkt.
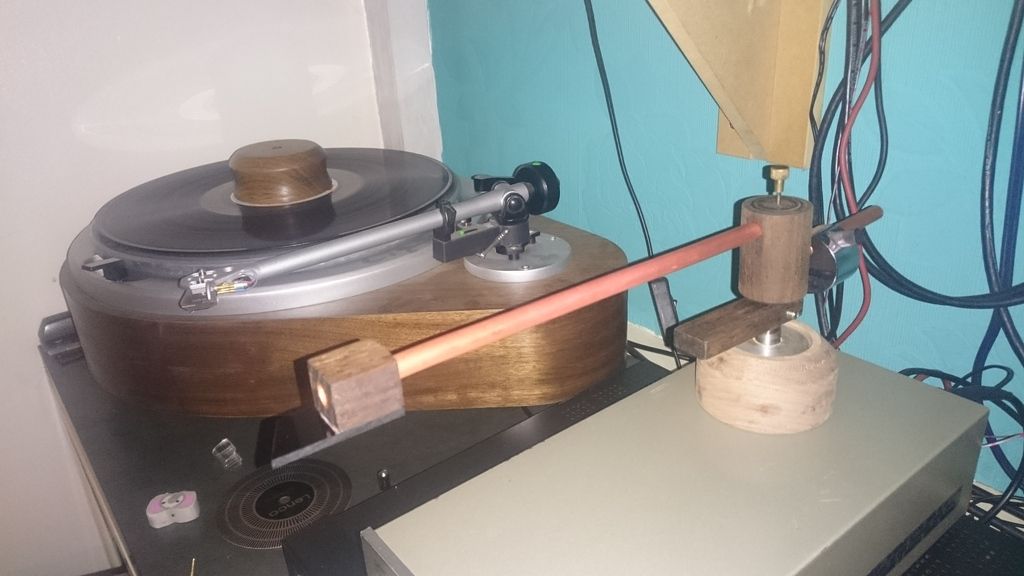
Hi richard, the original thought was to turn a complete wand, which ive done before but the pivot point/ stylus offset meant that i wasnt sure how to do it. I have another idea for that....
That very lenco you had at eggborough that i bought off you a couple of years later was the Genesis of the deck in the picture, in fact, the first iteration of this deck, the deck my dad has now is built from your original deck!
On the underside of the deck plate on his Tt, I marked it
'RHL',
Richard Higgins lenco
I was thinking about naming them the RHL, on the badges but havent got round to it......
-
cressy
- Shed dweller
- Posts: 2906
- Joined: Fri Aug 03, 2007 7:07 pm
- Location: the great white space
- Contact:
#34 Re: A unipivot made from scrap
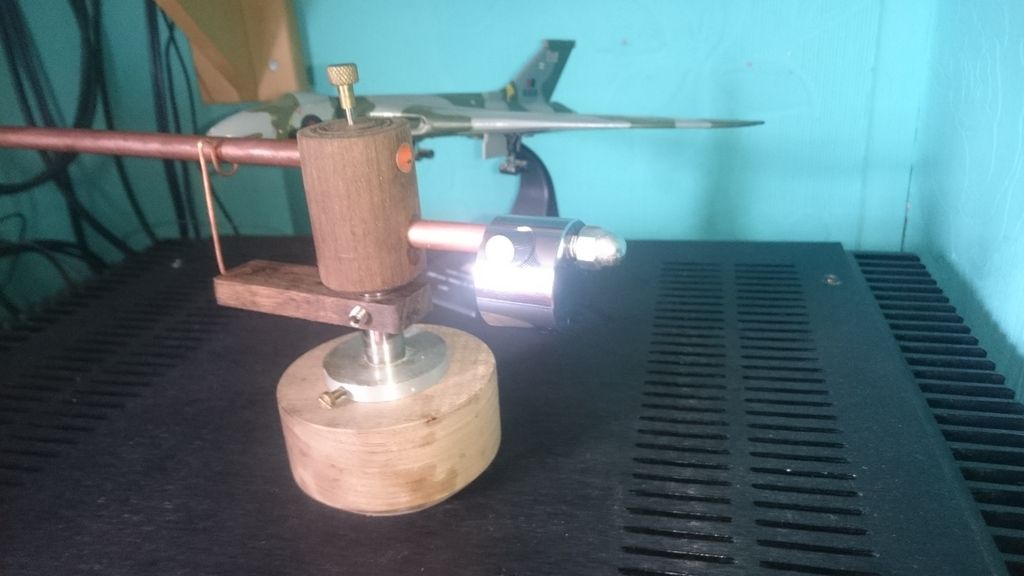
Trimmed the counterweight stub down to the correct size and filled it with silicone to replace some weight and damp it. It will want polishing before it is epoxied in place.
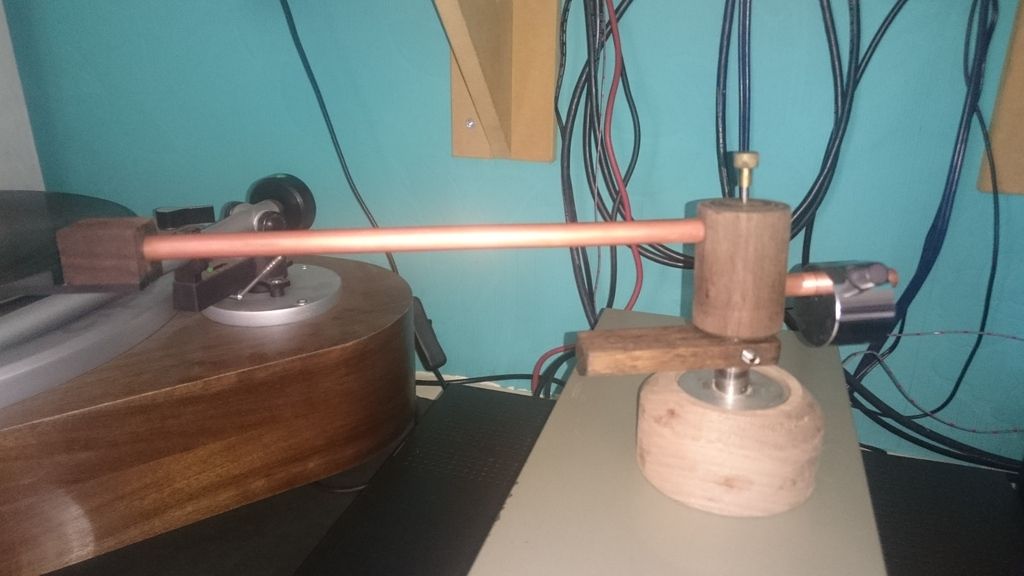
I'll polish the arm tube and stub, and apply a wax finish to the wooden parts as the danish oil has take nicely.
Ordered some copper litz for the internal wiring off vic at transfi as it is dirt cheap and having used it before I like the sound quality from it.
Next i will make a new base, as thinking on this, I need something that incorporates a socket for the wand wiring. It would be too fragile wiring it directly to plugs so i will need to wire it to a din socket, then use the output cable I made up for the rega
-
cressy
- Shed dweller
- Posts: 2906
- Joined: Fri Aug 03, 2007 7:07 pm
- Location: the great white space
- Contact:
#35 Re: A unipivot made from scrap
More progress today, a couple of little things. I made a new headshell as the original one wasnt wide enough when i went to drill the holes our for the bolts. Also added an arm rest made from copper wire to stay with the adopted steampunkt theme. And polished the copper tubes
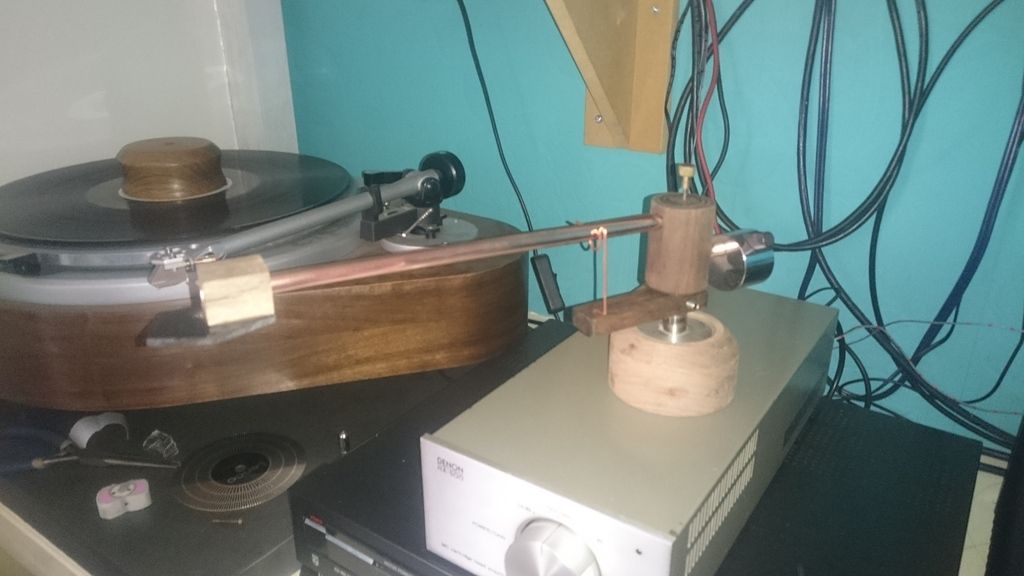
I measured the distance between the mounting bolt centres and the stylus on the 3 carts I have here and they all turned out to be 10mm. Wether its the same for all i dont know. So as I wanted the stylus to be in line with the front of the headshell, i went to drill the holes out 10mm back and found the problem.
The reshaped headshell will also allow a small hole for the wiring to go through to pin it back behind the cart, meaning I can run the wiring straight through the tube
-
Richard Higgins
- User
- Posts: 159
- Joined: Thu Oct 18, 2007 12:54 pm
- Location: Oxford
#36 Re: A unipivot made from scrap
deleted
Last edited by Richard Higgins on Tue Apr 18, 2017 8:31 pm, edited 1 time in total.
-
Richard Higgins
- User
- Posts: 159
- Joined: Thu Oct 18, 2007 12:54 pm
- Location: Oxford
#37 Re: A unipivot made from scrap
Hi Paul
Yes, but it was so long ago I'd forgotten about it until I saw your photo.
Time flies, I've just been looking at my build log for a variant of James C3g/2A3 amp. I used a C3m with input step up transformer. I completed monoblocks in Dec 2005. Over eleven years, the longest I've used any amp.
Sorry Ant, a bit off topic.
Cheers
Richard
-
andrew Ivimey

- Social Sevices have been notified
- Posts: 8318
- Joined: Mon Jun 11, 2007 8:33 am
- Location: Bedford
#38 Re: A unipivot made from scrap
I like it. My memory is such that I remember Ant using a flat piece of perspex and a '103' rubber banded to the perspex and it sounded lovely.
Okay I'm wrong but whatever approximates to that which Ant did was amazingly good to me.
And so it continues.
Okay I'm wrong but whatever approximates to that which Ant did was amazingly good to me.
And so it continues.
Philosophers have only interpreted the world - the point, however, is to change it. No it isn't ... maybe we should leave it alone for a while.
-
cressy
- Shed dweller
- Posts: 2906
- Joined: Fri Aug 03, 2007 7:07 pm
- Location: the great white space
- Contact:
#39 Re: A unipivot made from scrap
Got the new headshell drilled out for the cartridge bolts.
Thats it until some wire shows up. You can see how much lower the stylus is compared to the wand, bringing it on line with the pivot point in the bearing
That perspex arm was a 12" arm that was on the lenco 75 I did in a slate plinth about ten years ago. I used a flat wand that was tapered from front to back and had holes drilled all the way along its length. I think the reason that one was so nice is that the wand was completely dead, or it just didnt resonate in a way that excited the cart.
-
cressy
- Shed dweller
- Posts: 2906
- Joined: Fri Aug 03, 2007 7:07 pm
- Location: the great white space
- Contact:
#40 Re: A unipivot made from scrap
Another small change. In order to get the counterweight closer to the bearing housing I added a piece of threaded rod to the stub.
Cutting the stubwith a pipe cutter crushed the end in a little which means the 6mm stud will screw in and out. I added a cap nut to the end so it can be twiddled in and out so the tracking weight can be fine tuned without messing with the main weight once the lateral balance is set
Wire has arrived, im now thinking about the best way to deal with terminating it.
Ideally I want a connector of some sort so that the wand is completely removable, but something that isnt large and can be incorporated into the new base I need to make.
Any suggestions on a suitable 5pin connector?
I refuse to buy a 'proper' arm din socket and plug, its a waste of money on this lash up
Cutting the stubwith a pipe cutter crushed the end in a little which means the 6mm stud will screw in and out. I added a cap nut to the end so it can be twiddled in and out so the tracking weight can be fine tuned without messing with the main weight once the lateral balance is set

Wire has arrived, im now thinking about the best way to deal with terminating it.
Ideally I want a connector of some sort so that the wand is completely removable, but something that isnt large and can be incorporated into the new base I need to make.
Any suggestions on a suitable 5pin connector?
I refuse to buy a 'proper' arm din socket and plug, its a waste of money on this lash up

#41 Re: A unipivot made from scrap
How about one of these Ant, they are nice and light-
http://www.ebay.co.uk/itm/MISSION-774-H ... 1a1ccbed8d
http://www.ebay.co.uk/itm/MISSION-774-H ... 1a1ccbed8d
-
cressy
- Shed dweller
- Posts: 2906
- Joined: Fri Aug 03, 2007 7:07 pm
- Location: the great white space
- Contact:
#42 Re: A unipivot made from scrap
Thanks Ali, i thought about that style and was going to get one.
Found this at the same time
http://www.ebay.co.uk/itm/222473870772
Thought it was abit more substantial but still small enough. abit more to get hold of as I am notoriously cack handed when it comes to arm wiring.
I should be able to bunch the wiring up and sleeve it with heat shrink where it enters the plug, make it less likely to be broken by me being ham fisted, so I bought it instead
#43 Re: A unipivot made from scrap
Can't go wrong at that price.
-
cressy
- Shed dweller
- Posts: 2906
- Joined: Fri Aug 03, 2007 7:07 pm
- Location: the great white space
- Contact:
#44 Re: A unipivot made from scrap
Made a new base for the arm that fits into the rebate in the lenco plinth, cant get into photobucket at the moment though so will have to add the pics later.
I made it so that the mounting hole is offset and the base can be rotated in the circular rebate in the plinth to set the s/p distance.
I made it so that the mounting hole is offset and the base can be rotated in the circular rebate in the plinth to set the s/p distance.
-
cressy
- Shed dweller
- Posts: 2906
- Joined: Fri Aug 03, 2007 7:07 pm
- Location: the great white space
- Contact:
#45 Re: A unipivot made from scrap

Photobucket got there eventually.

No wiring, just wanted to see how it behaves in use. It will need some damping oil or silicone in the bearing to damp the rocking it initially does when the cart is dropped on. Also wants a finger lift, and the arm rest reshaping so that it isnt so tall. Need to secure the lead strip used to weight the bottom of the housing.

This is the mounting plate upside down, it drops into the rebate in the plinth and is able to spin. The mounting hole is offset to allow different arm tube length.
I hollowed out the underside so a socket can be fitted for the cabling, but i might do something else